All-on-4 Upper vs Lower Jaw in Japan: What Actually Differs
Reviewed by Dr. Ryosuke Murai, DDS, MSD — Prosthodontist, trained at Indiana University School of Dentistry (U.S.). Last updated July 2026.
Patients arriving from Tokyo or overseas often ask why we quote different surgical plans for the two jaws when the treatment carries a single name. The short answer: an All-on-4 upper vs lower jaw case is not the same operation twice. The mandible offers dense cortical bone, a predictable nerve landmark, and lips that hide the transition line. The maxilla offers softer bone, a sinus in the way, and a smile that shows everything. In Japan, where full-arch implant treatment is self-pay and planned in advance, those differences change implant number, loading protocol, the visits you should book, and sometimes the bridge material. This article is for quality-first patients weighing a full-arch decision.
The mandible is a structural problem. The maxilla is an aesthetic one.
Reduced to essentials, the lower jaw asks a mechanical question and the upper jaw asks an artistic one — though both must be answered well.
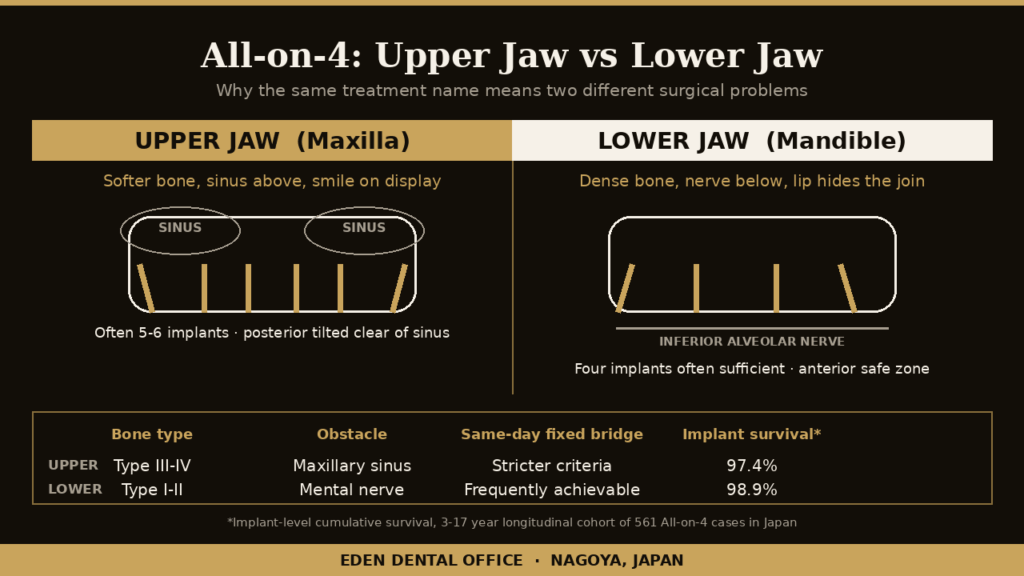
The mandible is a horseshoe of dense bone with a thick cortical shell. Between the two mental foramina — where the inferior alveolar nerve exits, usually near the premolar region — sits a safe zone that stays usable even after decades of denture wear. Four implants placed there, two upright at the front and two angled backward, engage bone that grips a screw firmly on the day of surgery. That initial grip is what permits a provisional bridge to be fitted quickly. The engineering is favorable; the risk to manage is proximity to the nerve.
The maxilla is architecturally the opposite. Its bone is more trabecular — spongier, thinner cortical shell — and it sits beneath two maxillary sinuses that expand downward as posterior teeth are lost. There is less dense bone to grip, and less of it in the back. The upper arch is also what people see: lip support, incisal edge position, and the bridge-to-gum junction are visible in a wide smile, so prosthetic design constrains the surgery rather than following it. We assess these constraints during the evaluation described in our article on who qualifies for All-on-4 and what bone loss changes.
Bone quality: the variable that drives everything downstream
Clinicians classify jawbone density on a four-part scale. It is a coarse tool, but it explains most of the divergence between arches.
| Bone type | Character | Typically found | Consequence for full-arch work |
|---|---|---|---|
| Type I | Almost entirely dense cortical | Anterior mandible | Excellent initial grip; requires careful drilling to avoid overheating |
| Type II | Thick cortical shell, dense core | Anterior mandible, some anterior maxilla | The favorable case — strong stability, good healing |
| Type III | Thin cortical shell, dense trabecular core | Anterior and mid maxilla | Workable; technique adjusts to preserve grip |
| Type IV | Thin shell, sparse trabecular core | Posterior maxilla | Lowest initial grip; immediate loading requires stricter criteria |
A lower arch is often Type I–II throughout the implant zone. An upper arch frequently runs Type III at the front and Type IV toward the back. This is why the same implant, torqued by the same hand, can register 45 Ncm in a mandible and 25 Ncm in a maxilla. Insertion torque and implant stability quotient are not academic numbers here — they are the gate deciding whether a fixed provisional bridge goes in on surgery day or whether we wait. A review of the principles governing immediate implant stability attributes early failure in low-density bone to poor initial grip combined with unfavorable loading — precisely the combination an upper arch is prone to.
What long-term data says about the two arches
The honest summary is that both arches perform well and the upper arch performs slightly less well. A longitudinal study of 561 All-on-4 cases in Japanese patients followed for three to seventeen years reported a cumulative implant-level survival of 97.4% in the maxilla against 98.9% in the mandible, with early failure significantly more common in the upper jaw. An eight-year retrospective evaluation of maxillary and mandibular All-on-4 rehabilitation reaches a similar conclusion: high survival in both arches, with the maxilla carrying the greater share of complications.
That gap of roughly one and a half percentage points does not make upper-arch treatment unwise. It means the margin for casual planning is thinner in the maxilla. Where a lower arch tolerates an approximate approach, an upper arch punishes it — and the punishment usually appears in the first year, not the tenth. That asymmetry is the reason to plan upper arches conservatively, not the reason to avoid them. No survival figure is a promise about any individual case.
How the plan actually changes at Eden
At Eden, every full-arch case begins with a cone-beam CT merged with an intraoral scan and a proposed tooth position in our planning software, then a surgical guide printed in our in-house lab. For a lower arch, that workflow is largely about precision around the mental nerve and distributing the four Straumann BLX fixtures so the cantilever stays short. For an upper arch it does more: we check whether the sinus floor permits a tilted posterior implant to land in the bone anterior to it, whether the residual ridge sits high enough to hide the bridge-to-gum junction under the lip, and whether scan density supports same-day loading at all.
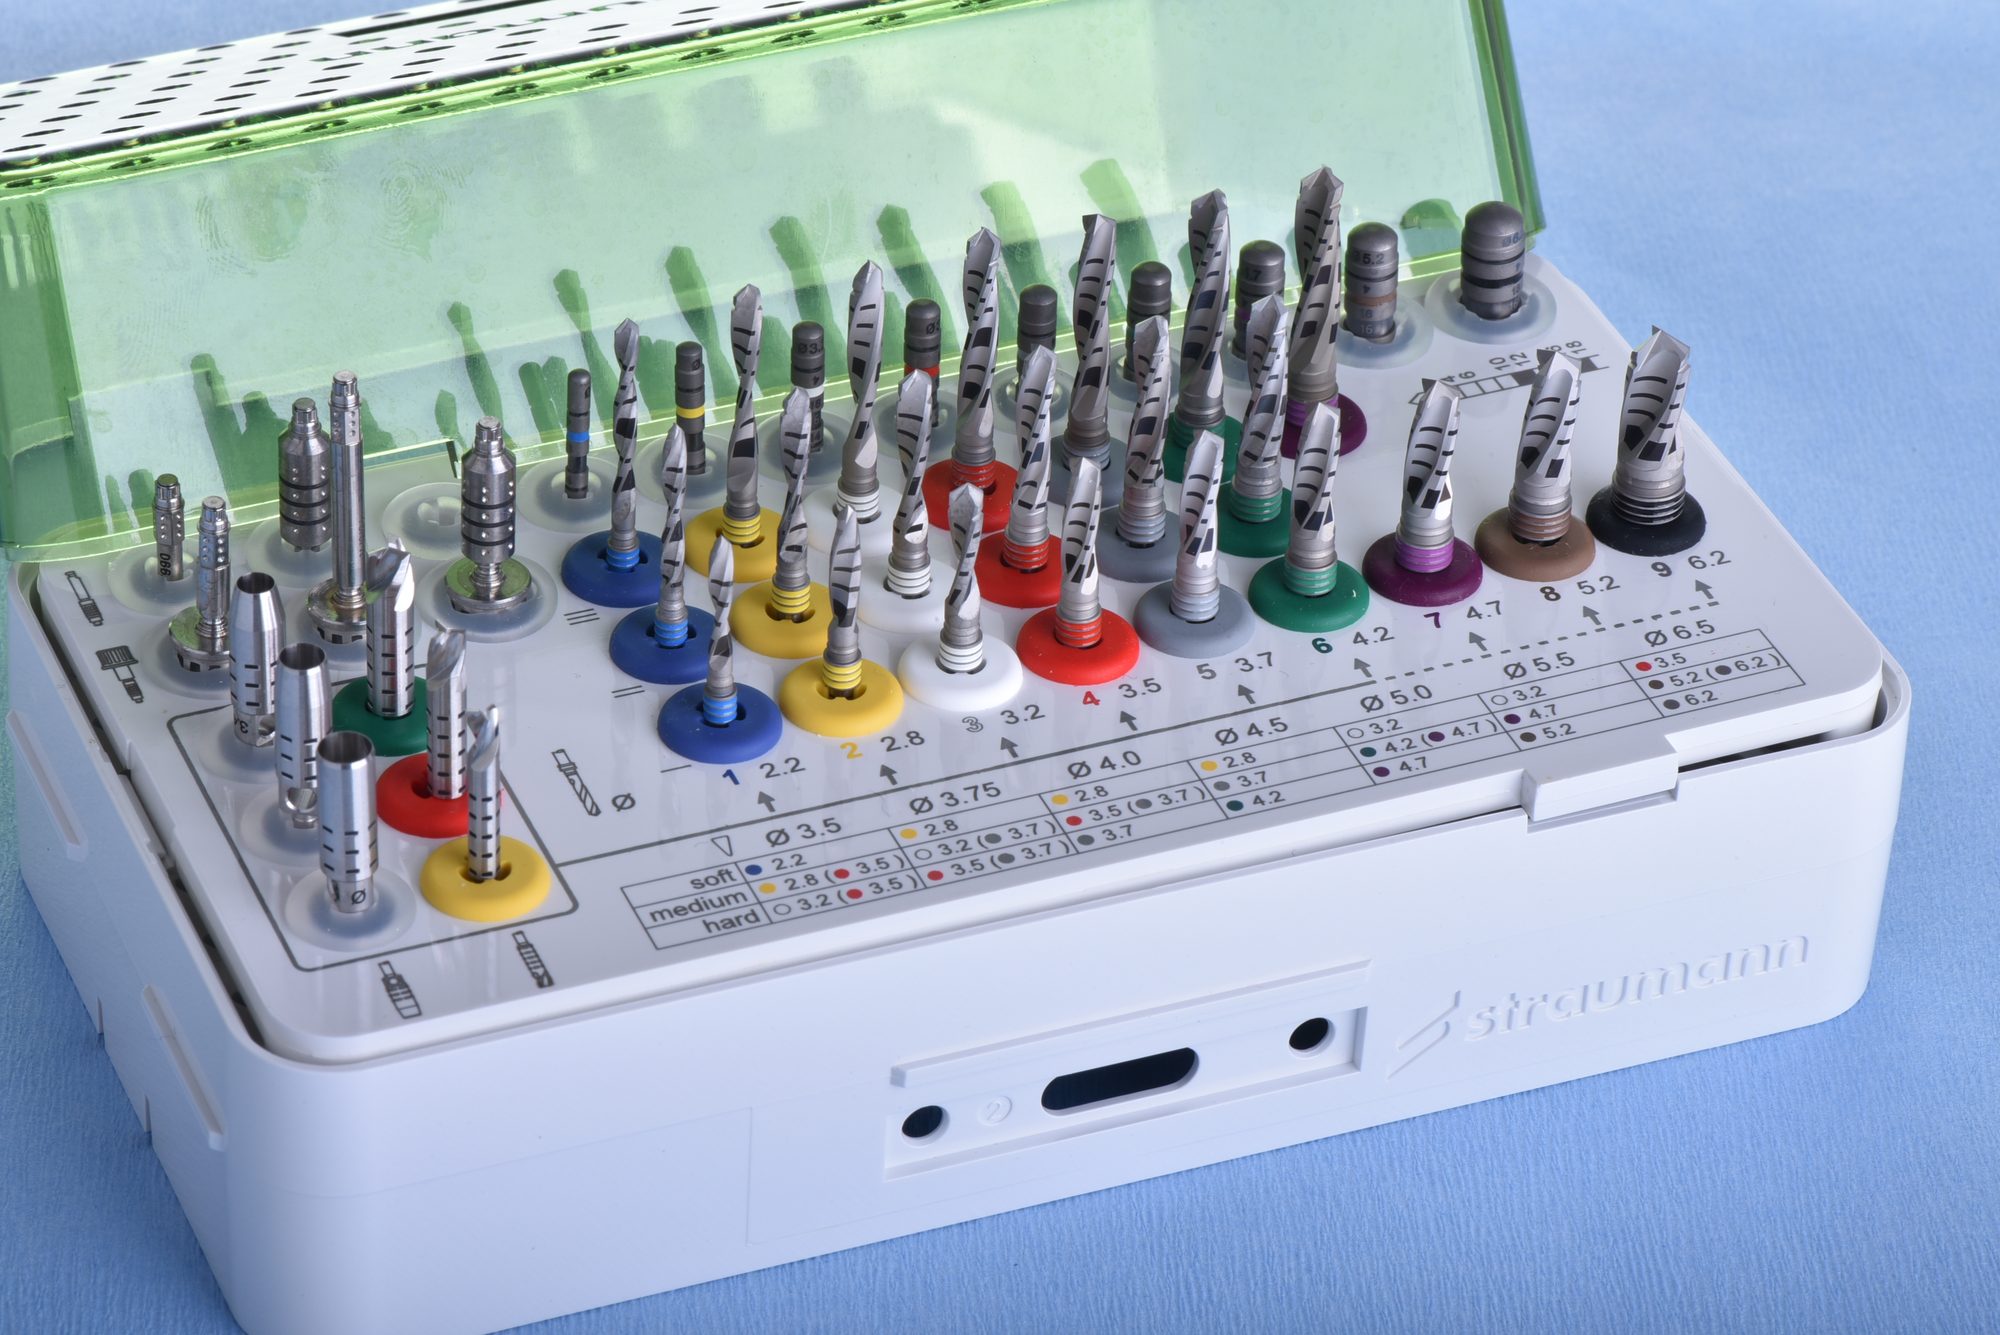
Two practical consequences follow. First, we place more than four implants in a maxilla more often than in a mandible — commonly five or six, because spreading load across additional fixtures compensates for softer bone. Second, we are more willing to stage an upper arch: place the implants, let them integrate for a few months under a removable provisional, then fit the fixed bridge. Patients on a compressed travel schedule sometimes find this disappointing, which is why we explain arch-specific sequencing at planning rather than at the surgical appointment. The general sequence is set out in our overview of how the All-on-4 timeline runs from same-day teeth to final bridge, and where the sinus is genuinely in the way, options and fees appear in our page on bone grafting and sinus lift costs.
Upper vs lower at a glance
| Planning factor | Lower jaw (mandible) | Upper jaw (maxilla) |
|---|---|---|
| Typical bone density | Type I–II, dense cortical | Type III–IV, more trabecular |
| Anatomical obstacle | Inferior alveolar and mental nerve | Maxillary sinus, nasal floor |
| Common implant number | Four is often sufficient | Five or six is common |
| Same-day fixed provisional | Frequently achievable | Achievable but criteria are stricter |
| Aesthetic demand | Moderate — lip covers the junction | High — smile line exposes the transition |
| Bridge material pressure | Strength and wear | Strength, wear, plus shade and translucency |
| Reported implant survival | ~98.9% (Japanese longitudinal cohort) | ~97.4% (same cohort) |
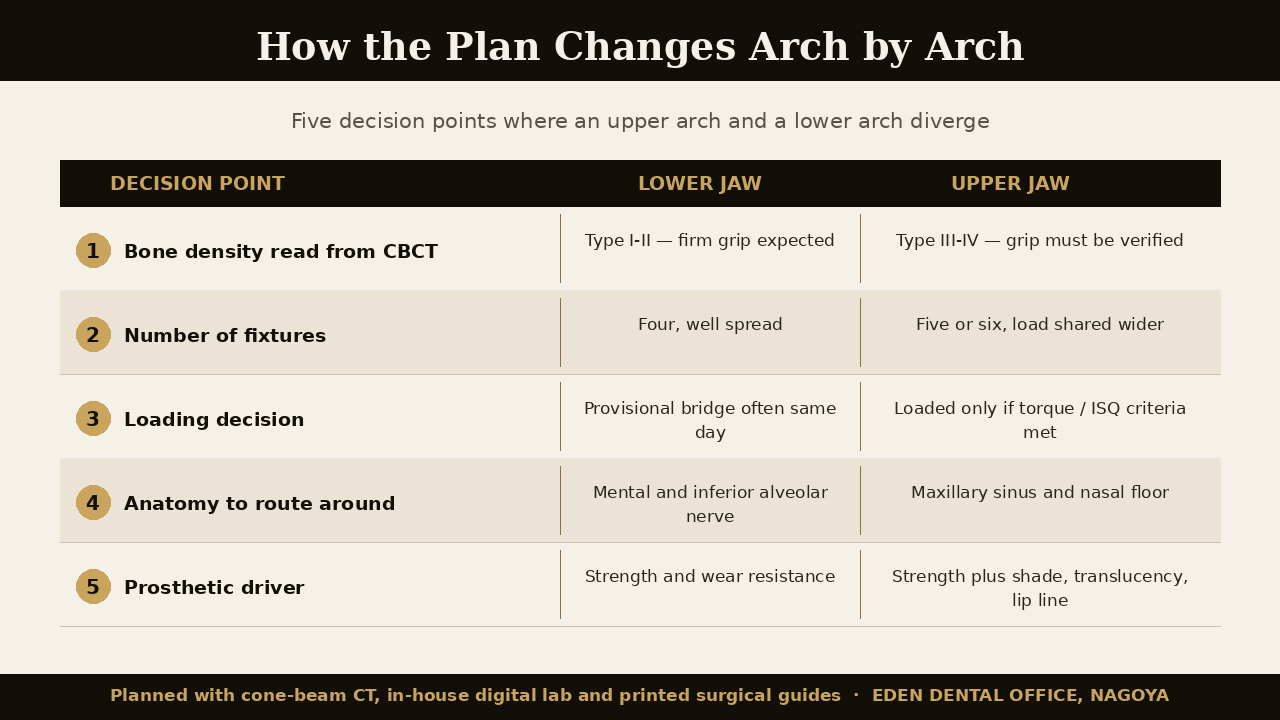
The last row of that table deserves a note. Because the upper bridge is on display, shade matching and translucency carry weight in the maxilla that they do not carry below — a factor we discuss in the context of choosing between acrylic-titanium hybrid and monolithic zirconia bridges.
What this costs
An upper arch is frequently more expensive than a lower arch for the same patient, for structural rather than arbitrary reasons: additional implants, a greater likelihood of sinus-related procedures, a longer provisional phase, and higher aesthetic demands on the final bridge each add cost. Our published anchors are the comprehensive check-up package at ¥40,000 and the whitening package at ¥75,000; membership plans run ¥88,000 to ¥288,000 per year. Full-arch fees are not a single figure, so we do not publish one — instead every patient receives a written estimate in English, itemized by surgical and prosthetic phase, before anything is scheduled. Current listings are on our fee page, and the components driving a full-arch quote are broken down in our article on what a realistic All-on-4 fee in Japan includes. If you are treating both arches, ask for them priced separately — a combined number hides the asymmetry described above.
Arch anatomy also shapes how problems are handled later; we cover the practicalities in what happens when an implant fails under a full-arch bridge.
Frequently Asked Questions
Is the upper jaw harder to treat than the lower?
Generally yes. Softer bone, sinus proximity, and visible aesthetics make upper-arch planning more demanding, though long-term survival in both arches is high.
Can I get same-day teeth on my upper jaw?
Often, but not always. It depends on measured implant stability at surgery. We set the criteria before the appointment and tell you if we intend to stage instead.
Why would I need six implants instead of four?
Extra fixtures distribute chewing load across softer bone. In a maxilla this is a common and deliberate adjustment, not an upsell.
Should I treat both jaws at the same time?
Many patients do, and a single surgical episode can reduce total travel. Whether it suits you depends on bone, medical history, and how much recovery time you can allow.
Does treating only the lower jaw cause problems above?
It can. A fixed lower arch biting against an upper denture or worn natural teeth changes load distribution, so we assess both arches even when you plan to treat one.
Risks, limits, and what to expect
Full-arch implant treatment carries real risks in both jaws: infection, implant failure and the need for replacement, sinus complications in upper cases, altered sensation near the mental nerve in lower cases, screw loosening, fracture or wear of the prosthesis over years of function, and peri-implant bone loss where maintenance lapses. Smoking, uncontrolled diabetes, and heavy clenching raise these risks measurably. Treatment demands ongoing professional maintenance for as long as the bridge is in service; no implant restoration is maintenance-free or lasts indefinitely. Outcomes depend on bone volume, medical history, oral hygiene, and bite forces. Individual results vary.
If you are weighing an upper arch, a lower arch, or both, a consultation with a cone-beam scan is where the discussion becomes concrete rather than theoretical. You can read the full overview of how full-arch implant treatment works in Japan, or see the range of options on our dental implants page. We work in English, and WhatsApp is the fastest way to reach us from outside Japan.
More on this topic: Implant Guides — every article we have published in this cluster, grouped by stage.