
Implant Crown Stage in Japan: Impressions and Gum Shaping
Reviewed by Dr. Ryosuke Murai, DDS, MSD — Prosthodontist, trained at Indiana University School of Dentistry (U.S.). Last updated August 2026.
Your implant has healed. Nothing hurts, nothing is visible, and the surgery you spent months deciding on is behind you — and yet there is no tooth there yet. The implant crown stage in Japan is the part of treatment almost nobody explains in advance: a short series of appointments in which the gum is opened, shaped, recorded and finally covered by the crown you actually came for. This guide is written for self-pay patients who want to understand what those visits do, why the gum is treated as carefully as the ceramic, and how the stage is scheduled if you are travelling in from Tokyo or overseas for implant treatment in Japan.
What the restorative stage is, and what it is not
Placing an implant and restoring an implant are two separate projects. The surgical phase ends when the titanium is in bone and healing undisturbed; you can read how that phase feels in our guide to the implant procedure and recovery timeline. The restorative stage begins only when that healing is confirmed, and it is prosthetic work: it decides the shape, the contact points, the bite and the gum contour that you will live with.
The stage is short in chair time and long in calendar time, which is why it surprises people. Three of the five steps below take under an hour each; the waiting between them is what stretches the schedule.

Step one: confirming the implant is ready to carry a crown
Before anything is attached, we want objective evidence that the implant is anchored. At Eden we take a resonance-frequency reading and compare it against the value recorded on the day of surgery; a rising or stable figure is what allows the restorative stage to open. Our article on implant stability and ISQ measurement explains what those numbers mean and why we do not treat a calendar date as sufficient proof on its own.
For most single implants in reasonable bone this point arrives roughly eight to twelve weeks after placement. Grafted sites, softer posterior bone and heavy smokers all sit at the longer end. If the reading is not where it should be, the correct answer is to wait — restarting a case is far more expensive than a delayed appointment.
Step two: uncovering and the healing abutment
If the implant was closed under the gum, a short visit exposes it and a healing abutment is screwed in place of the cover screw. This component does one job: it holds open a channel through the gum so that soft tissue heals around a shape rather than over a flat surface. It takes twenty to thirty minutes under local anaesthetic.
Some implants are placed with the healing abutment already in position at surgery, which removes this appointment entirely. Which route is chosen is decided at planning time from the CBCT scan and the thickness of the gum, not improvised on the day.
Step three: shaping the gum before the crown is designed
This is the step that separates a crown that looks like a tooth from a crown that looks like a crown. Natural teeth widen gradually as they leave the bone; an implant is a narrow cylinder that must be transitioned outward to the width of a molar or an incisor. That transition — the emergence profile — is created in soft tissue over a few weeks, either by a shaped healing component or by a screwed provisional crown that is adjusted at intervals.
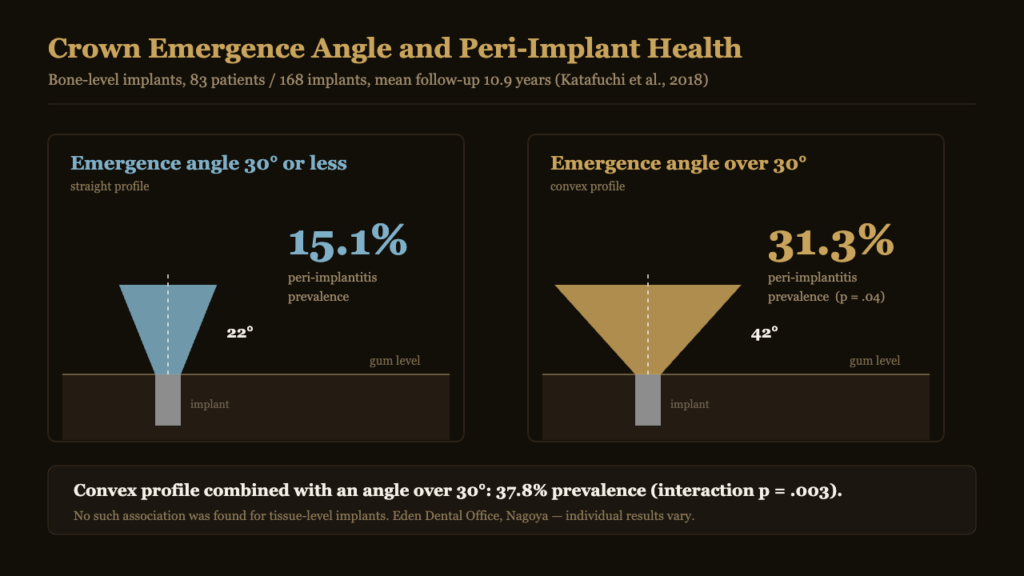
It also matters for health, not only appearance. In a cross-sectional radiographic analysis of 83 patients with 168 implants followed for a mean of 10.9 years, Katafuchi and colleagues found that restoration contour is a risk indicator for peri-implantitis: among bone-level implants, prevalence was 31.3% where the emergence angle exceeded 30 degrees, against 15.1% at 30 degrees or less (p = .04). Where a convex profile was combined with an angle over 30 degrees, prevalence reached 37.8%, with a significant interaction between angle and profile (p = .003). No such association appeared in the tissue-level group. Read plainly: an over-flared crown is harder to clean and harder for tissue to tolerate, and that is a design decision made at this stage, not a maintenance problem to solve later.
| Approach to shaping | How it works | Typically used when |
|---|---|---|
| Stock healing abutment | A round component of fixed diameter; the tissue heals to a circular opening. | Back teeth, thick gum, cases where the crown shape is not aesthetically demanding. |
| Customised healing component | The round shape is modified toward the tooth form before it is fitted. | Premolars and molars where the emergence needs widening but a provisional is not warranted. |
| Screwed provisional crown | A temporary crown shapes the tissue and is adjusted over several visits; the final result is copied. | Front teeth and any case where gum symmetry with the neighbouring tooth is the point. |
Shaping usually runs two to six weeks. Front-tooth cases can take longer, because we are matching the gum height and papillae of the tooth next door and there is no way to rush biology into symmetry.
Step four: recording the implant with a scan or an impression
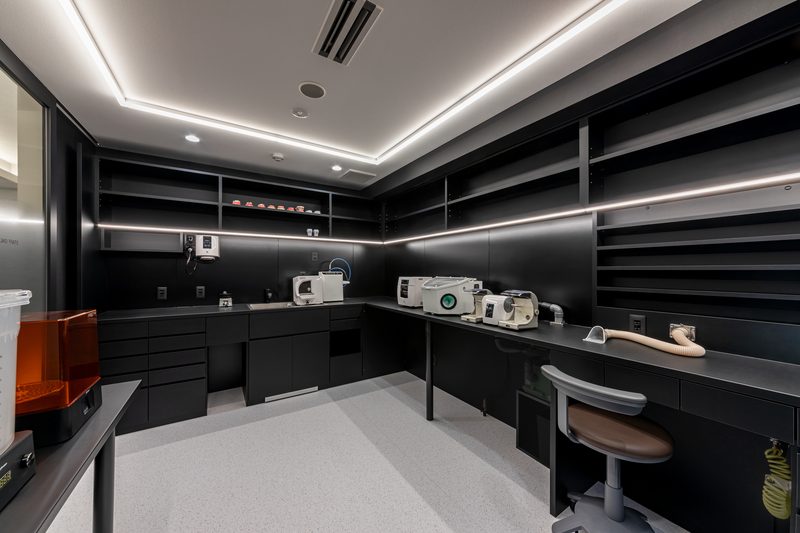
Once the tissue holds its shape, the implant position has to be transferred to the laboratory with sub-millimetre accuracy. A digital record uses a scan body — a small marker screwed into the implant whose geometry the scanner recognises — and the file goes straight to our in-house lab. A conventional record uses a transfer coping and a silicone or polyether impression material.
The evidence now supports the digital route for ordinary single-implant and short-span work. A 2025 systematic review and meta-analysis in the Journal of Dentistry pooled seven clinical studies covering 151 partially dentate patients and reported that digital impressions showed significantly lower deviation than conventional impressions, with no significant difference in angular displacement. The authors also flag considerable heterogeneity across studies (I² = 80–97%) and advise caution in long-span or angulated cases — which is precisely where we still reach for a conventional record.
| Digital scan with a scan body | Conventional impression | |
|---|---|---|
| What you experience | A camera passes over the arch; no tray, no setting material. | A loaded tray held in place for two to five minutes. |
| Chair time | Shorter, and a poor scan can be redone in seconds. | Longer, and a flawed impression means starting again. |
| Transfer to the lab | File sent instantly; design can begin the same day. | Physical model must be poured before design begins. |
| Where it is strongest | Single crowns and short spans; lower deviation in the pooled clinical data. | Long-span and markedly angulated implants, and patients who cannot tolerate scanning. |
| Our default at Eden | First choice for single implant crowns. | Reserved for the cases above, or as a cross-check. |
Step five: fit, torque and the review that follows
The crown is tried in, contacts with the neighbouring teeth are checked with floss, and the bite is refined so that the implant carries slightly less load than the natural teeth beside it under light closure. The screw is then tightened to the manufacturer’s torque value with a calibrated driver — for Straumann components that figure is specified by the system, not estimated — and the access channel is sealed. Whether the crown is held by that screw or by cement changes what happens at this appointment, which we cover in screw-retained versus cemented implant crowns.
We see patients again about two weeks later. Tissue relaxes around a new contour, contacts settle, and small adjustments at that point prevent the food-trapping complaint that otherwise surfaces months on. From there the case moves into ordinary maintenance, described in our guide to implant aftercare.
What this stage costs and how it is quoted
At Eden the restorative stage is not priced as a surprise at the end. The abutment, the crown, the laboratory work and the fitting appointments are itemised in a written English estimate before surgery is booked, so that the figure you approve at the start is the figure you pay at the finish. Current published anchors on our fee page include the ¥40,000 examination package and the ¥75,000 whitening package; implant crown fees vary with the component, the ceramic and whether a provisional shaping stage is needed, so we present the range in writing at consultation rather than quoting a single number here.
Three things move the figure: whether a provisional crown is used to shape tissue, whether the abutment is a stock titanium base or a custom-designed one, and the ceramic chosen. Over a fifteen-year horizon the larger cost is not the crown but the upkeep, which we break down in what implant maintenance actually costs in Japan.
The tissue being shaped and recorded at this stage depends on what you started with. See why the width of keratinized gum around an implant matters and how the assessment is done before surgery.
Frequently Asked Questions
How long does the implant crown stage take from start to finish?
For a straightforward single implant, commonly four to eight weeks from uncovering to crown delivery. Front teeth needing tissue shaping run longer.
Does the healing abutment appointment hurt?
It is done under local anaesthetic and usually takes twenty to thirty minutes. Most patients report pressure and mild tenderness for a day or two.
Can I have the crown fitted on one trip to Japan?
Often yes, if the implant has already integrated. Our in-house lab lets scan, design and fit sit inside a compressed schedule; see our dental treatment trip guide.
Is a digital scan more accurate than a traditional impression?
For single implants and short spans the pooled clinical data show lower deviation with digital scanning. For long spans or angulated implants the evidence is less settled.
Why does my gum look uneven right after the crown goes in?
Tissue is briefly blanched and compressed by the new contour. It normally settles within two to three weeks, which is why we review at that point.
Risks, limits and what can go differently
Implant crowns are restorations, not replacements for biology. Screws can loosen, ceramic can chip, contacts can open and allow food impaction, and peri-implant tissue can become inflamed — the emergence-angle data above is a reminder that crown design contributes to that risk. Shaping soft tissue does not always achieve full symmetry with an adjacent natural tooth, particularly where bone was lost before the implant was placed. Where the aesthetic result cannot be predicted, we say so before treatment rather than after. Costs, timelines and the number of appointments quoted here are typical planning figures for a single implant crown and will differ with your anatomy, bone quality and the number of implants involved. Individual results vary.
If you are weighing up implant treatment in Japan and want the restorative stage explained against your own scan rather than in general terms, our consultation is conducted in English and ends with a written plan and estimate. Details of the surgical and restorative pathway are on our dental implants page, and WhatsApp is the fastest way to reach us from outside Japan.
More on this topic: Implant Guides — every article we have published in this cluster, grouped by stage.