
Dental Implant Procedure in Japan: Timeline, Pain, Recovery
Reviewed by Dr. Ryosuke Murai, DDS, MSD — Prosthodontist, trained at Indiana University School of Dentistry (U.S.). Last updated July 2026.
Much of what people fear about the dental implant procedure comes from stories that are twenty years out of date. In a modern Japanese clinic, a single implant is placed in roughly 30 to 60 minutes under local anesthesia, most patients manage the first days with ordinary over-the-counter analgesics, and the longest part of treatment is not surgery at all — it is quiet, uneventful bone healing. This guide walks through the implant process step by step as it is actually practiced at a prosthodontist-led implant clinic in Japan: what happens at each visit, how long each phase takes, what discomfort is realistic to expect, and how recovery differs when planning is digital rather than freehand. It is written for self-pay patients across Japan and abroad who want to understand the sequence before committing to it.
The implant process at a glance: five phases
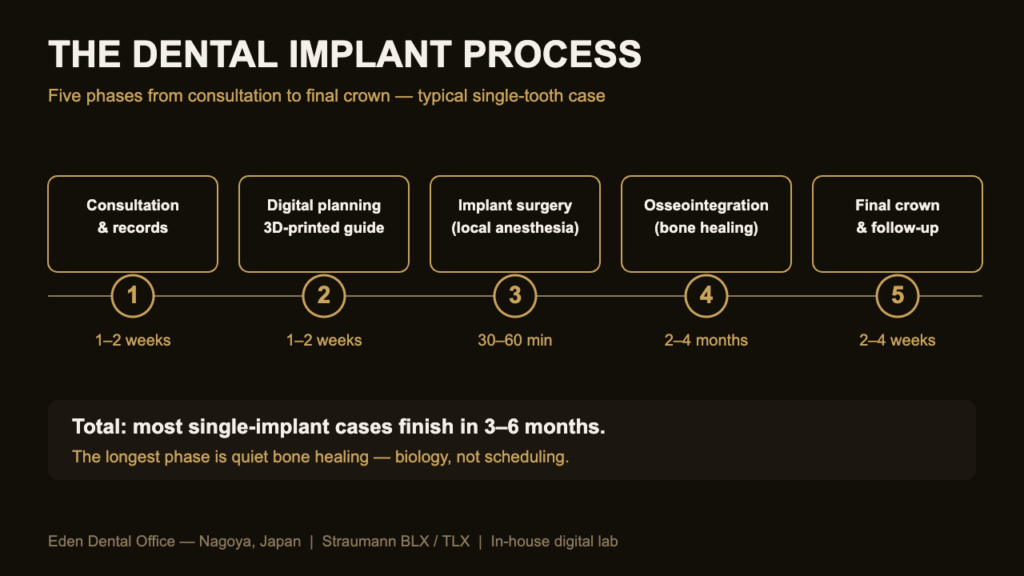
Every implant case moves through the same five phases, whether it involves one tooth or several. What changes between clinics is how much of the work is planned digitally before anyone picks up a scalpel, and how much is improvised on the day. The table below shows the typical sequence for a straightforward single-tooth case with adequate bone; add-on procedures such as grafting extend it.
| Phase | What happens | Typical duration | Visits |
|---|---|---|---|
| 1. Consultation & records | CBCT scan, intraoral scan, medical history, written treatment plan and estimate | 1–2 weeks | 1–2 |
| 2. Digital planning | Implant position simulated on the CBCT; surgical guide designed and 3D-printed | 1–2 weeks | 0 (lab work) |
| 3. Implant surgery | Guided placement under local anesthesia; sutures if needed | 30–60 min per implant | 1 |
| 4. Osseointegration | Bone fuses to the implant surface; temporary tooth options as needed | 2–4 months (site-dependent) | 1–2 short checks |
| 5. Final restoration | Abutment connected; crown designed, milled and fitted | 2–4 weeks | 2 |
From first consultation to final crown, most single-implant patients finish in three to six months. The calendar length is dominated by phase 4 — biology, not scheduling. Patients sometimes read this as slowness; in reality, attempting to shortcut osseointegration is one of the avoidable causes of early implant loss.
Phase 1–2: consultation, CBCT and digital planning
A properly planned implant begins with three-dimensional information. A CBCT (cone-beam CT) scan shows bone height, width and density around the planned site, together with the structures that must be respected — the inferior alveolar nerve in the lower jaw, the sinus floor in the upper. An intraoral scanner records the teeth and gums digitally, replacing conventional impressions for most cases.
At Eden Dental Office, we merge these two data sets and plan the implant position on screen before surgery is scheduled: the fixture is positioned for the future crown first — prosthetically driven planning — and only then checked against the available bone. We place Straumann implants (BLX and TLX systems), and because the clinic runs an in-house digital lab with milling and 3D printing, the surgical guide that transfers the on-screen plan to the mouth is designed and printed on site rather than outsourced. For patients traveling from Tokyo, Osaka or overseas, this also compresses the visit count: records taken on one day can become a printed guide without a second preliminary trip. How that works for fly-in patients is covered in our guide to treatment timelines for full-arch cases, and the same logic applies to single teeth.
Phase 1 is also where the written estimate belongs. In Japan, implants are self-pay, so a serious clinic should hand you an itemized document in English — fixture, surgery, guide, abutment, crown, follow-up — before asking for any commitment. What a complete quotation should contain is detailed in our breakdown of implant quotes in Japan.
Phase 3: surgery day, step by step
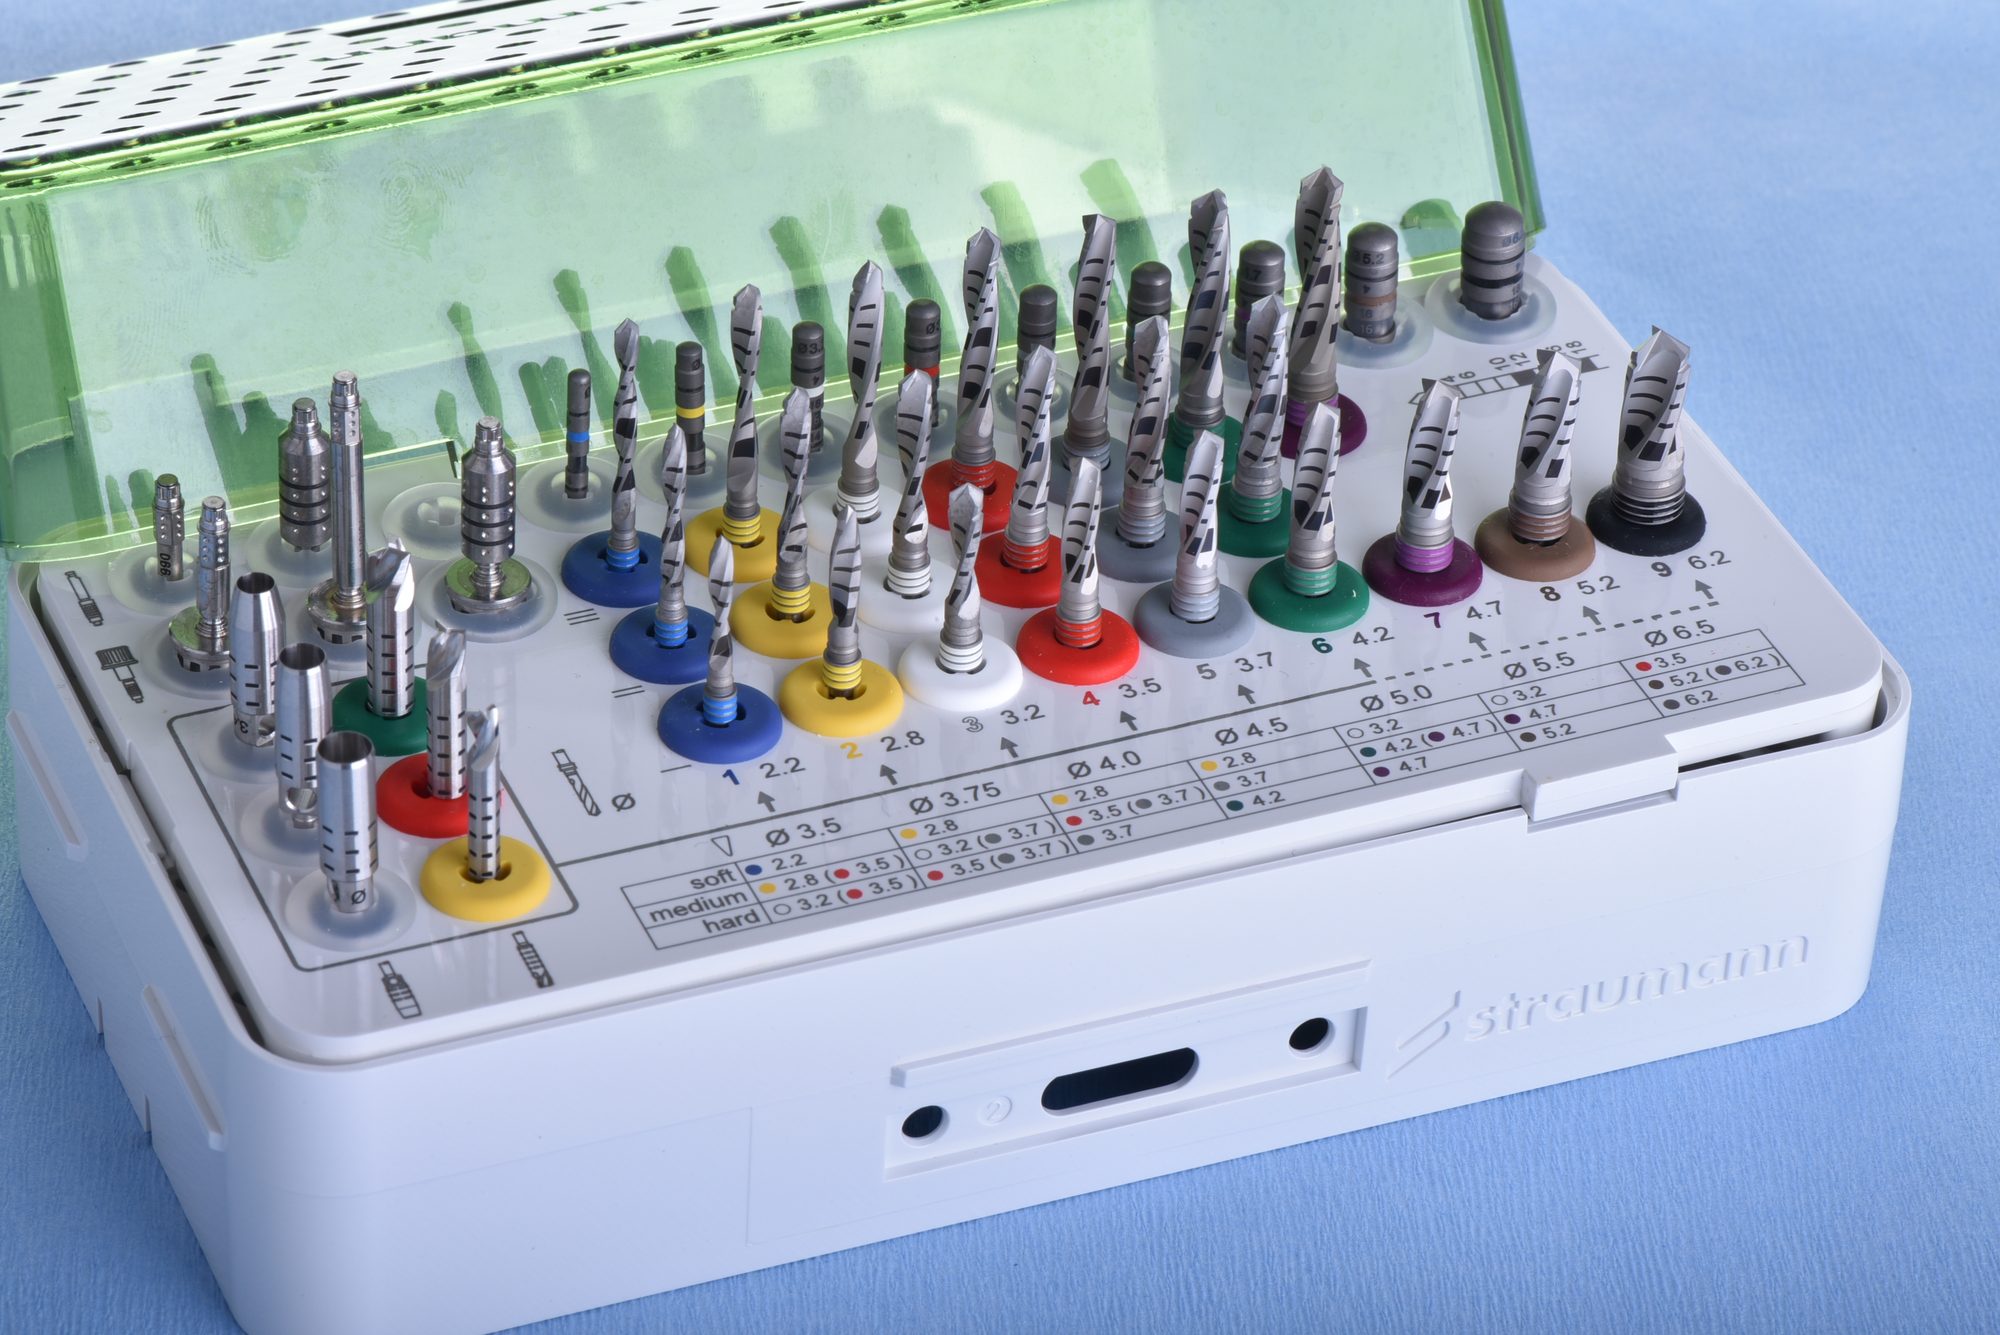
On the day of surgery, the sequence for a guided single-implant placement typically looks like this:
- Anesthesia (5–10 min). Local anesthetic only, in most cases — the same category of anesthesia used for a filling, dosed for a longer procedure. Sedation options exist for anxious patients but are not routinely necessary for single implants.
- Guide seating and osteotomy (10–20 min). The 3D-printed guide snaps onto the teeth and directs the drills to the planned angle and depth. Drilling through the guide sleeve is what patients describe as pressure and vibration, not pain.
- Implant placement (5–10 min). The Straumann fixture is threaded into the prepared site at a controlled torque. Primary stability — how firmly the implant grips the bone at insertion — is measured, not guessed.
- Closure (5–15 min). Depending on the plan, a healing cap is left exposed through the gum or the site is closed over the implant. Sutures, if placed, come out in about ten days.
Total chair time, including waiting for anesthesia, is usually under an hour for one implant. You walk out with instructions, not a hospital stay. Driving home afterward is generally fine when only local anesthesia was used.
Does it hurt? Pain, swelling and the first week
The honest answer: implant surgery is uncomfortable, and the discomfort is usually milder and shorter than patients expect. In a prospective study of patients undergoing implant placement published in the Journal of Periodontology, most participants rated their post-surgical pain at the low end of the scale, with discomfort peaking on the day of surgery and declining steadily over the following days. That matches what we see clinically: the typical single-implant patient takes an analgesic on day 0 and day 1, then stops.
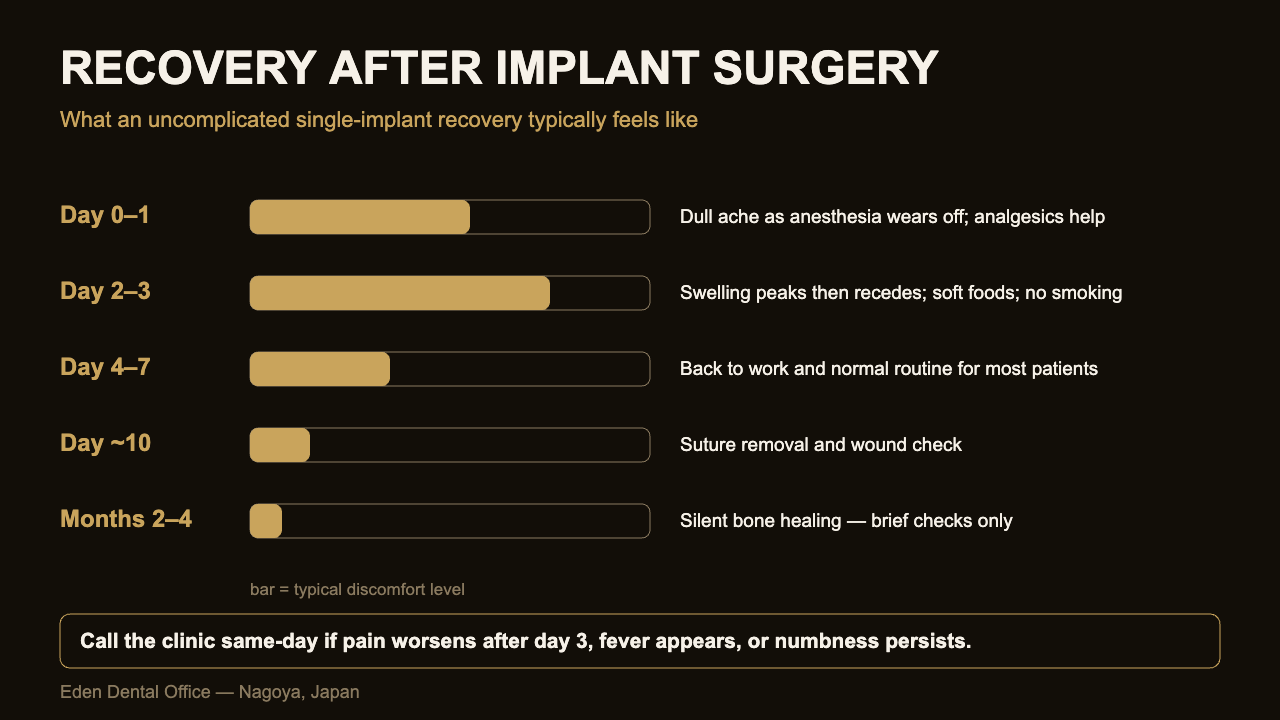
A realistic first-week picture for an uncomplicated case:
- Day 0–1: dull ache as the anesthetic wears off, managed with prescribed or over-the-counter analgesics; minor oozing is normal.
- Day 2–3: swelling peaks, then recedes. Bruising of the cheek is possible and harmless. Soft foods, no smoking, gentle rinsing.
- Day 4–7: most patients are back to normal work and social schedules; many return to desk work the day after surgery.
- Day 10 or so: suture removal and a brief wound check.
Pain that intensifies after day 3, fever, or numbness that persists beyond the anesthetic period are not part of normal recovery and warrant a call to the clinic the same day. Larger surgeries — multiple implants, or grafting procedures such as those described in our article on bone grafts and sinus lifts in Japan — carry proportionally more swelling and a longer soft-food period, and your surgeon should tell you that in advance rather than let you discover it.
Phase 4: osseointegration — the quiet months
After surgery, the implant must osseointegrate: living bone grows onto the fixture’s treated titanium surface until the two are mechanically one. Nothing dramatic happens at the surface of the gum during these weeks, which is precisely the point. Long-term data on this process is reassuring — a 10-year retrospective of 511 implants in 303 patients, using the same implant system we use, published in Clinical Implant Dentistry and Related Research, reported implant survival close to 99% over the full decade — but the early months are when the foundation is set.
Timelines are site-dependent. Dense lower-jaw bone may be ready for loading in around two months; softer upper-jaw bone, or grafted sites, often need three to four. During this phase you will visit briefly once or twice so the site can be checked, and you will have a temporary solution for a visible gap — a removable tooth, a bonded provisional, or in selected high-stability cases an immediate temporary crown placed the day of surgery. Whether immediate loading is sensible for you is a planning decision based on measured stability, not a promotional one, and it is one of the questions worth asking any clinic that offers same-day full-arch protocols.
If the tooth is still in place: extraction timing and immediate placement
Many implant journeys start one step earlier, with a tooth that has not yet been removed. In that situation the sequencing question — when to extract, and when to place — shapes the whole calendar, and there are three recognized approaches.
Immediate placement puts the implant into the socket at the same appointment as the extraction. It saves a surgical episode and two to three months of calendar time, but it demands intact socket walls, no active infection at the tip of the root, and enough bone beyond the socket to lock the fixture firmly. Early placement waits six to eight weeks for the gum to close over the socket, then places the implant into soft-tissue-healed bone — often the pragmatic middle path for front teeth, where gum contour decides how natural the final crown looks. Delayed placement waits three to six months for the socket to fill with new bone before any implant surgery; it is the conservative default after infections, fractures with bone loss, or difficult extractions.
Which path applies is a radiographic and clinical judgment, not a preference. At Eden, the CBCT is taken before the extraction whenever possible, so the socket anatomy, the surrounding bone and any infection are mapped while the tooth is still in place — that single scan often determines whether a patient needs one surgery or two, and it is the reason we ask patients not to have a failing tooth pulled elsewhere before the planning consultation. An extraction done without a plan can convert a straightforward immediate placement into a delayed case that needs grafting.
For patients comparing quotes, this is also a hidden cost variable: two surgical episodes cost more than one, and a socket graft placed at extraction to preserve bone volume adds a line item that a bare “implant price” never shows. It is another reason an itemized written estimate matters more than a headline figure.
Phase 5: the final crown, and what happens after
Once integration is confirmed, an abutment — the connector between implant and crown — is fitted, a final digital scan is taken, and the crown is designed and milled. With an in-house lab, the loop between design, milling, staining and glazing happens under one roof, which is why shade corrections that take other clinics an extra outsourced round-trip can often be handled the same week. The crown is then torqued to specification and the access channel sealed.
The procedure does not end at delivery. Implants do not decay, but the bone and gum around them respond to plaque exactly as natural teeth do, and peri-implant disease is the main long-term threat. A maintenance rhythm of professional cleanings and periodic radiographs — typically every four to six months — is part of the real cost of ownership, which we quantify in the 10-year view of implant maintenance costs in Japan.
What this costs
Implant treatment in Japan is self-pay, and the total depends on the number of implants, the need for grafting, the restoration type and the materials chosen. We do not publish a single implant price here because a number without a diagnosis is not information — it is bait. Our published anchors are the initial check-up package (¥40,000), which includes the records phase described above, and membership plans (¥88,000–¥288,000 per year) that cover the maintenance rhythm afterward; current details are on the fee page. For the surgical and prosthetic fees themselves, you receive a written, itemized estimate in English at the planning stage, before any irreversible step. For orientation on what moves implant pricing in Japan generally, see the complete English guide to dental implant costs in Japan.
Recovery does not end when you leave the clinic: our day-by-day implant aftercare guide for the first two weeks sets out what to do at home, hour by hour.
If anxiety about the appointment rather than the treatment itself is what is holding you back, our guide to sedation options for implant surgery in Japan explains what nitrous oxide, an oral sedative and intravenous conscious sedation each actually involve.
Before any of this begins, the site is examined in three dimensions: our guide to what a CBCT scan shows before an implant is planned covers the measurements that fix the plan.
How long that healing interval runs is not a fixed figure: it is set by the stability readings taken at surgery and before the crown, which is why two patients treated the same week can be given different dates.
For patients travelling from outside Nagoya, we have mapped how these phases fall across one, two or three visits in our guide to dental treatment trips to Japan.
The restorative stage that follows healing has a design decision of its own: we explain how the finished crown is attached to the implant, screwed or cemented, and why that choice is made before surgery.
Once the implant has integrated, the restorative appointments begin: we walk through the implant crown stage, from healing abutment to gum shaping and the final scan, step by step.
Bone integration is only half the story: the band of firm tissue the implant emerges through matters too. Our guide to implant gum health and keratinized tissue width in Japan explains what is measured at planning and when grafting is worth doing.
Frequently Asked Questions
How long does the whole implant process take in Japan?
Most single-implant cases run three to six months from consultation to final crown. The longest phase is bone healing, which cannot responsibly be compressed below site-appropriate minimums.
Is the implant procedure painful?
Surgery itself is done under local anesthesia, so you feel pressure rather than pain. Afterward, published patient studies and our own experience point to mild, short-lived discomfort controlled with ordinary analgesics for a day or two.
Can I work the day after implant surgery?
Most patients with desk jobs return to work the next day. Plan for visible swelling around days two to three, and avoid strenuous exercise for about a week.
How many visits does an implant require?
Typically four to six: records, surgery, one or two healing checks, and two restorative visits. Digital planning and an in-house lab keep the count at the low end, which matters for patients traveling from other regions.
What can go wrong during recovery?
Early warning signs are pain that worsens after day three, fever, persistent numbness, or a mobile implant. All are uncommon, and all are reasons to contact the clinic immediately rather than wait for a scheduled visit.
Risks, limitations and next steps
Implant surgery carries real risks: infection, early loss of the implant before integration, nerve injury in the lower jaw, sinus involvement in the upper jaw, and later peri-implant inflammation if maintenance lapses. Smoking, uncontrolled diabetes and certain medications raise these risks measurably. A minority of implants fail even with careful planning, and revision is possible but adds time and cost. Individual results vary. The purpose of the consultation phase is to establish — with a CBCT, a medical history and an unhurried conversation — whether these risks are acceptable in your specific case, and to put every figure in writing before you decide.
If you are weighing implant treatment and want the process explained on your own records rather than in general terms, you can read more about how we plan and place implants in Nagoya or contact the clinic in English via WhatsApp to arrange a consultation.
Related reading in this cluster
These articles cover the neighbouring decisions referred to above in more detail than this page allows:
More on this topic: Implant Guides — every article we have published in this cluster, grouped by stage.